Rate This Recipe
Pretty easy to make recipe and tastes great.
-
Taste10
If you’ve ever ordered paneer at an Indian restaurant and wondered how to recreate that perfectly golden, spice-coated exterior at home, this spiced pan-fried paneer recipe is your answer. Unlike paneer swimming in rich curry sauces, this preparation celebrates the fresh cheese in its simplest, most satisfying form—crispy on the outside, soft and chewy on the inside, coated with warm spices that transform mild paneer into something absolutely crave-worthy.
Quick Summary:
This pan-fried paneer recipe coats 7-8 ounces of paneer cubes in spiced olive oil (turmeric, coriander, cumin, paprika) then pan-fries them until golden brown on both sides—about 3-4 minutes per side. The oil-spice mixture ensures even coating. Serve immediately while crispy with basmati rice or coconut rice. Total time: 15 minutes.
Table of Contents
What Makes Paneer Perfect for Pan-Frying
Paneer occupies a unique place in the world of cheeses—it’s a fresh, unaged cheese that doesn’t melt when heated, making it ideal for cooking methods that would turn mozzarella or cheddar into a puddle. This remarkable heat stability comes from paneer’s production method: milk is curdled with lemon juice or vinegar, then the curds are pressed to remove whey, creating a firm block that holds its shape beautifully through frying, grilling, or simmering in sauces.
On its own, paneer tastes quite mild—creamy and milky with just a hint of tanginess from the curdling agent. This neutral flavor profile is actually paneer’s greatest strength because it acts as a blank canvas for whatever spices, sauces, or seasonings you pair it with. In rich curries like palak paneer or paneer tikka masala, it absorbs the surrounding flavors while maintaining its shape and texture. In this pan-fried preparation, the spices cling to the surface, creating concentrated flavor on the crispy exterior.
You’ll find packaged paneer in Indian grocery stores and increasingly in regular supermarkets, usually in the refrigerated section near other specialty cheeses or in the international foods aisle. The packages typically contain 7-8 ounces (200-225 grams) of firm, white cheese that’s ready to use straight from the package. Some brands are firmer than others—firmer paneer is actually easier to work with for pan-frying because it holds its shape better and develops a more substantial crust.
Fresh homemade paneer is also an option if you’re ambitious. Making paneer from scratch requires just milk, lemon juice or vinegar, and cheesecloth, though the process takes a couple of hours from start to finish including pressing time. If you go the homemade route, make sure to fully chill your paneer before attempting to cut and fry it—cold paneer is much easier to slice cleanly and less likely to crumble during cooking.
The Genius of the Oil-Spice Mixture Technique
The key innovation in this recipe—what separates it from other pan-fried paneer preparations—is mixing the spices with oil before tossing with the paneer cubes. This might seem like a small detail, but it fundamentally changes how the spices adhere to the cheese and how they taste in the final dish.
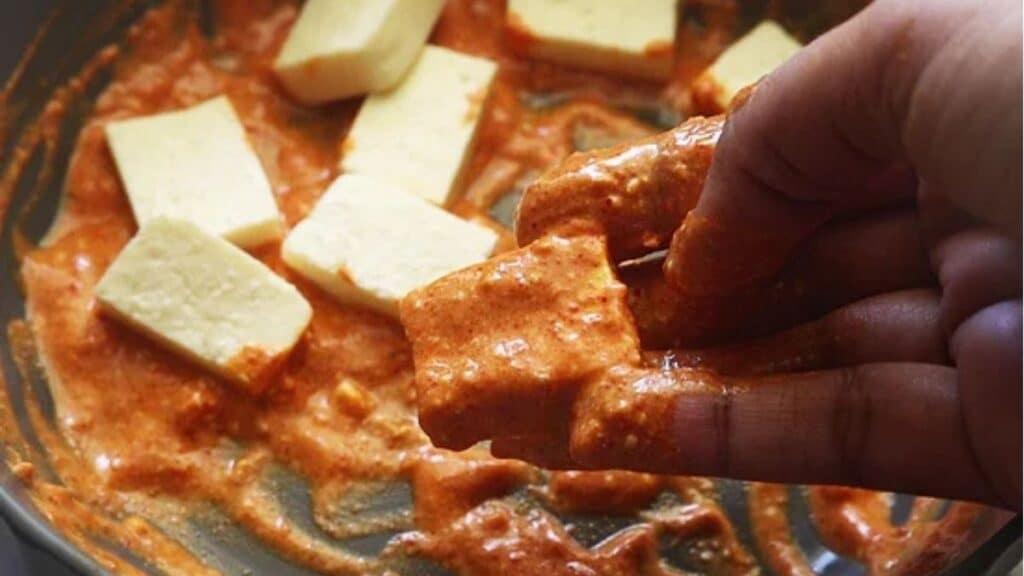
By first creating a spiced oil mixture—combining 1 tablespoon of olive oil with turmeric, coriander, cumin, paprika, and salt—you create a paste-like consistency that clings beautifully to the paneer’s surface. The oil acts as a binding agent, helping the spices stick uniformly to each piece. When you toss the paneer in this spiced oil, you can actually see and feel the coating adhering evenly, and you can use your hands to rub any bare spots to ensure complete coverage.
The oil also serves a flavor function beyond just adhesion. When spices are mixed with oil, they begin to bloom slightly even before they hit the hot pan. The fat-soluble flavor compounds in spices like cumin and coriander dissolve into the oil, creating a more integrated, cohesive flavor rather than the raw, dusty taste that dry spices sometimes have. This pre-blooming effect means your pan-fried paneer tastes more complex and developed.
Another advantage: the oil coating helps protect the paneer slightly during frying. The thin layer of spiced oil creates a barrier that allows the exterior to crisp up beautifully without the interior drying out. You get that perfect contrast of textures—crunchy outside, creamy inside—that makes pan-fried paneer so irresistible.
The specific spice combination here is beautifully balanced. Turmeric provides earthy depth and that characteristic golden color. Ground coriander adds gentle, lemony warmth. Cumin brings its distinctive earthy, slightly nutty flavor that’s fundamental to Indian cooking. Paprika contributes mild sweetness and vibrant red color without adding heat (though you could substitute smoked paprika or cayenne if you want spiciness). Together, they create a warm, aromatic coating that enhances rather than overwhelms the mild paneer.
CHECK MORE ON:These Viral 3-Ingredient Chocolate Truffles Are Easy Enough for Kids to Make
Cutting Paneer: Size and Shape Matter
Before you can fry your paneer, you need to cut it properly, and the size and shape of your pieces significantly impact the final result. The recipe calls for slices about ¼ to ½ inch thick, then cut into 1-inch pieces, creating small rectangular or square bites rather than large slabs or tiny dice.
This specific size is strategic. Pieces that are too thick won’t develop a good crust-to-interior ratio—you’ll bite into too much soft paneer without enough crispy exterior. Pieces that are too thin become entirely crispy without that desirable textural contrast, and they’re also more prone to drying out or burning before they develop good color. The ¼ to ½ inch thickness hits the sweet spot where you can achieve proper browning in 3-4 minutes per side without overcooking.
The 1-inch width and length create bite-sized pieces that are easy to eat and that fit comfortably in your mouth in one or two bites. These dimensions also provide enough flat surface area for stable pan contact, ensuring the paneer sears properly rather than tipping over or cooking unevenly. When you have good flat surfaces making contact with the hot pan, you get even browning and that satisfying crust.
Use a sharp knife for cutting paneer—a dull knife will compress and crumble the cheese rather than slicing cleanly through it. Cut with smooth, decisive strokes rather than sawing back and forth. If your paneer is particularly soft or warm, chill it in the refrigerator for 30 minutes before cutting to firm it up, making the cutting process much easier and producing cleaner edges.
Some paneer brands are softer and more delicate than others. If you notice your paneer crumbling or falling apart as you cut it, it’s likely a softer variety or it hasn’t been pressed enough during production. You can still use it, but handle the pieces more gently during the spicing and frying stages. A firmer paneer will hold up better to aggressive tossing in the spiced oil and won’t fall apart when you flip it in the pan.
After cutting your paneer, transfer all the pieces to a mixing bowl large enough to toss them comfortably without pieces flying out. You need room to coat them thoroughly with the spiced oil, so don’t crowd them in a bowl that’s too small.
Step-by-Step: Coating and Pan-Frying to Golden Perfection
Once your paneer is cut and ready in a mixing bowl, prepare your spiced oil mixture in a small separate bowl. Combine 1 tablespoon of olive oil with ¼ teaspoon turmeric, ½ teaspoon each of ground coriander, ground cumin, and paprika, plus ¾ teaspoon salt. Stir this mixture thoroughly until the spices are evenly distributed in the oil and you have a vibrant orange-red paste.
Heat a skillet—preferably non-stick, especially if you’re using fresh homemade paneer that can be stickier—over medium heat with the remaining 1½ tablespoons of olive oil. Wait for the oil to shimmer and become properly hot before adding the paneer. You can test if it’s ready by dropping a tiny piece of paneer into the oil; it should sizzle immediately upon contact.
Add your spiced paneer pieces to the hot pan in a single layer, leaving a bit of space between each piece if possible. Don’t crowd the pan—if necessary, fry in batches rather than piling pieces on top of each other. Crowding reduces the pan’s temperature, causes steaming rather than searing, and prevents proper browning. You want direct pan contact with high heat for each piece.
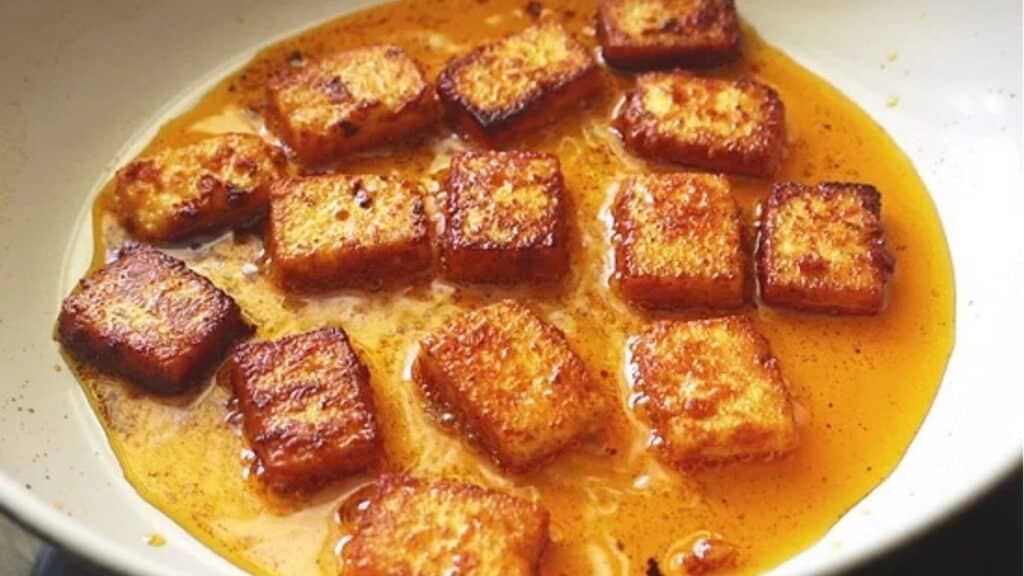
Let the paneer fry undisturbed for 3-4 minutes. Resist the urge to move them around or flip them early. They need time to develop that golden-brown crust, and if you flip too soon, the spices will stick to the pan instead of staying on the paneer. You’ll know they’re ready to flip when you can easily slide a spatula under them without resistance and when the edges touching the pan have turned a beautiful golden brown.
Flip each piece carefully using a thin spatula or tongs, revealing the gorgeously browned underside. Fry the second side for 2-3 minutes until it matches the first side’s golden color. The second side typically cooks slightly faster than the first because the pan has maintained its heat and the paneer has warmed through.
Once both sides are golden and crispy, immediately transfer the fried paneer to a serving plate. Don’t leave them sitting in the hot pan where they’ll continue cooking and potentially burn.
Serving Pan-Fried Paneer: Timing and Accompaniments
The recipe includes an important instruction that many cooks miss: serve the paneer as soon as they’re done. This isn’t just a suggestion—it’s genuinely crucial for the best eating experience. Pan-fried paneer, like many fried foods, is at its absolute peak the moment it comes out of the pan when the exterior is at its crispiest and the interior is warm and soft.
As paneer cools, its texture changes significantly. The crispy crust softens and becomes somewhat chewy or leathery rather than crunchy. The interior, which was pleasantly soft and warm, firms up and becomes denser and more rubbery. While cooled pan-fried paneer is still edible and flavorful, it’s a notably different and less appealing experience than eating it fresh and hot.
If you’re serving this as part of a larger meal and need to cook other dishes, save the paneer for last. Have your rice or other accompaniments ready and waiting before you start frying the paneer, so you can plate everything immediately once the paneer is done. Your guests might have to wait a few minutes for the paneer to finish cooking, but that’s infinitely preferable to serving them room-temperature paneer that’s lost its textural magic.
For accompaniments, the recipe suggests basmati rice or coconut rice, both excellent choices. Plain steamed basmati rice with its nutty fragrance and fluffy texture provides a neutral base that lets the spiced paneer shine. The mild rice absorbs any oil and spices that fall from the paneer, creating flavorful bites throughout your meal.
Coconut rice offers a more flavor-forward pairing, with its creamy richness and subtle sweetness playing beautifully against the warm spices on the paneer. The combination creates a more cohesive flavor experience where each component enhances the other.
What to Do With Leftover Pan-Fried Paneer
Despite the recommendation to serve pan-fried paneer immediately, sometimes you’ll have leftovers—maybe you made more than expected, or your dinner guests didn’t finish everything. Understanding how to store and reheat leftover pan-fried paneer ensures you can still enjoy it later without too much quality loss.
The best reheating method, as the recipe notes, is to pan-fry them again. Heat a skillet with a bit of oil over medium heat and add your leftover paneer pieces. Fry for 1-2 minutes per side until they’re heated through and the exterior has crisped up again. This re-frying restores much of the original texture and makes the paneer enjoyable once more. You won’t achieve quite the same peak freshness as the original frying, but it comes remarkably close.
Alternatively, repurpose leftover pan-fried paneer in ways where the texture change doesn’t matter. Chop it up and add it to fried rice, mix it into pasta with vegetables and sauce, toss it into grain bowls, or incorporate it into wraps or sandwiches where it’s surrounded by other ingredients. In these preparations, the spiced flavor is what matters most, and the texture difference is less noticeable.
You can also crumble leftover pan-fried paneer and use it as a topping for soups, salads, or roasted vegetables. The spiced crumbles add protein and flavor without the expectation of crispy texture that fresh pan-fried paneer carries.
Scaling the Recipe and Making Larger Batches
The recipe yields 2-4 servings depending on whether you’re serving it as a main protein source or as a side dish, using a standard 7-8 ounce package of paneer. For larger gatherings or if you want substantial leftovers, you can easily double or even triple this recipe with a few considerations.
When doubling the recipe, simply double all ingredients—use 14-16 ounces of paneer (two packages), 2 tablespoons of spiced oil for coating, 3 tablespoons for frying, and double all the spices. The preparation method remains identical, though you’ll definitely need to fry the paneer in multiple batches rather than crowding your pan.
If you’re making large quantities for a party or meal prep, consider setting up an assembly line: cut all the paneer first, coat all the pieces with spiced oil in a large bowl, then systematically fry batch after batch, transferring finished pieces to a baking sheet in a warm oven until all the frying is complete.
Can you freeze pan-fried paneer? Yes, though with the understanding that the texture will change. Freeze cooled pan-fried paneer in a single layer on a baking sheet until solid, then transfer to freezer bags for up to 2 months. Thaw in the refrigerator overnight and reheat by pan-frying as described earlier. The texture will be slightly different—a bit drier and denser—but still flavorful and useful in various dishes.